|
|
|
|
News The Project Technology RoboSpatium Contribute Subject index Download Responses Games Gadgets Contact <<< Xylophone Demonstration servo motor >>> Basics on CNC machinesVideo about cheap CNC machines
Same as me you are facinated by these cheap CNC machines and want to buy one? Weak points of the mechanics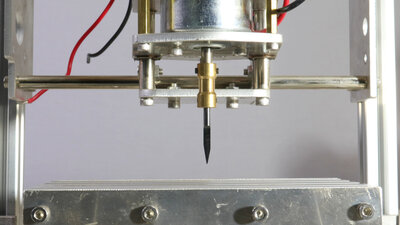
The milling spindle consists of a simple DC motor with a tool holder attached to the output shaft. The lever from the tool tip to the lower motor bearing is gigantic for milling spindles, which inevitably results in a poor runout. 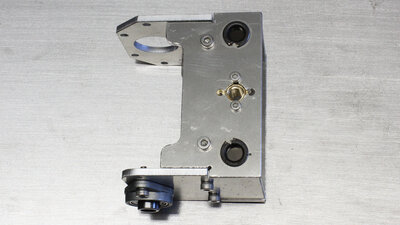
The axes are moved along round steel. With the cheapest of my CNC machines, the "T8", steel bushings are used to guide the axes. These enclose the round steel with a slight clamp, so there is no noticeable play. The disadvantage is that the friction is quite high. 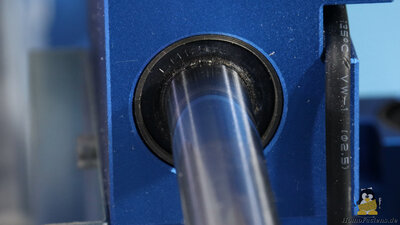
Instead of steel bushings, the more expensive models use linear ball bearings to guide the axes along the rods. Sounds better, but it really isn't, as inexpensive machines also use inexpensive ball bearings that have noticeable backlash perpendicular to the direction of travel. 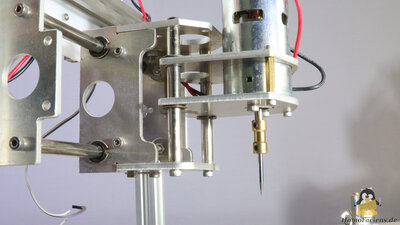
The mechanics of a CNC is never ideally stiff and therefore bends under load. The very unfavorable, because unnecessarily long, lever ratios of the mechanics increase the undesirable effects of backlash and bending. 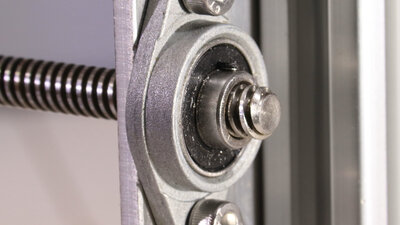
The spindles used to move the axes have a fixed and a loose end. The fixed end must of course allow for rotation of the spindle, but must be mounted on the frame with as little backlash as possible. The ball bearings shown here have noticeable backlash and the spindle mount is not perfectly centric. 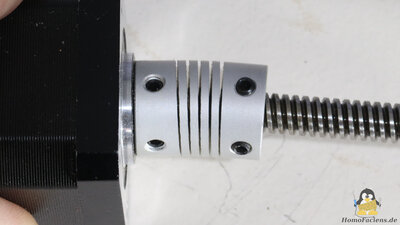
The lack of precision of the spindle attachment at the fixed end is compensated for at the loose end with a flexible coupling to the drive motor. This coupling allows the spindle to deviate crosswise, as well as along the spindle axis. However, it is very stiff when transferring rotary motion. 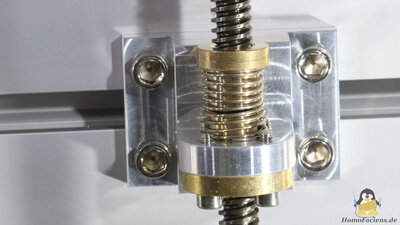
The drive spindles work with brass nuts. These have noticeable backlash. In order to compensate for this, a certain amount of preload is applied to the main nut on the other two CNC machines via a coil spring and a second brass nut. With that, the axis is pressed against the windings of the spindle with the corresponding force. This preload concept is widespread in the field of CNC machines, but only works as long as the forces during operation of the machine remain below the force given by the preload. Furthermore, there is: the higher the preload, the higher the undesired friction caused by the mechanism. With the CNC machines disccussed here, the preload is rather low so that it is only effective as long as the lateral forces during milling are rather low, too. What to expect from a cheap CNC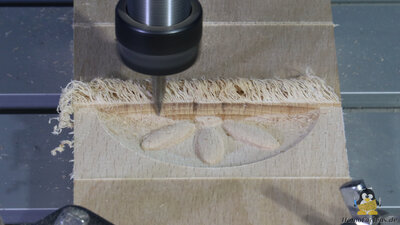
You shouldn't expect to be able to mill metal with these CNC machines, but engrave plastic or mill wood can be done with a precision that is quite impressive. When milling wood as shown here, the workpiece is processed line by line and only from left to right. Thus, the direction of force on the cutter and the mechanics is always the same, so that the backlash has almost no visible influence on the quality of the result. You can teach and learn a lot about the software path from the digital template to the finished workpiece, because this path is anything but "click and done!" Electronics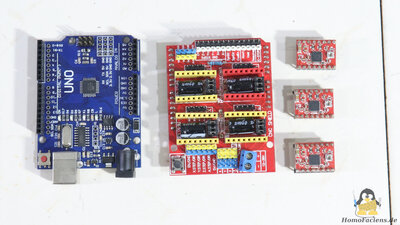
The T8 is the Hacker-friendliest in this respect, because the main circuit board consists of an Arduino UNO clone and a CNC shield with the corresponding motor controls on top. The stepper drivers are attached to the shield and can be replaced if necessary - it couldn't be better. Furthermore, all pins of the ATmega are easy to reach via the shield - which makes hacks in electronics extremely easy to carry out. The firmware can be customized at will via the Arduino IDE. 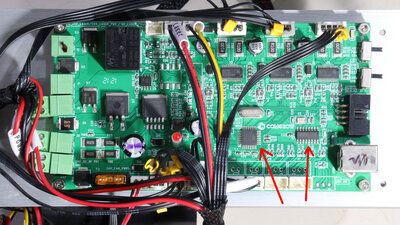
The combination "Arduino clone + CNC shield" has meanwhile been replaced by completely soldered main boards in the machines available on the market. Nevertheless, these are mostly the same components. 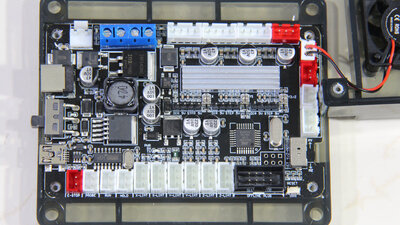
If you want to learn programming with a CNC or just want to get a little more out of the firmware, you should make sure that the machine is advertised with grbl as firmware. 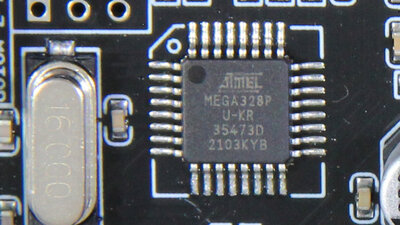
There should be an ATmega328 microcontroller on the motherboard. 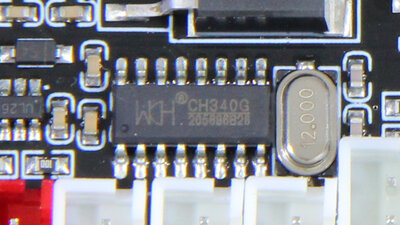
There should also be a chip on the board that has a label starting with CH34. This is used for the USB interface. "Hacking" the firmwareBy manipulating the firmware you can make your CNC unusable under certain circumstances!!! You make the changes described here at your own risk!!! I cannot guarantee success!!!The procedure described on this page refers to the Linux operating system. If you use a different system, you will have to solve any problems yourself. I don't use anything else! Linux is the most widely used operating system when it comes to machine control and robotics. If you want to enter the world of "Physical Computing", you can't avoid it and should (if you haven't already done so) install this operating system on your hard disk. I tested the instructions to be read here with Linux Mint, which is highly recommended for Linux beginners. Modifying the firmware starts with creating a backup copy! To do this, the CNC is connected to the USB interface. Then, in a terminal window type the command:
lsusb This command displays, if the CNC machine was detected and if a chip type ch34.. is used for USB communication. The output of the command should look like this:
Bus 005 Device 001: ID 1d6b:0001 Linux Foundation 1.1 root hub The second to last line, which indicates an HL-340 USB adapter, is what to look for . Now it's time to find out what the Linux internal name of the CNC machine's USB interface is. This can be found with the command:
ls /dev/tty* The output on my laptop without the CNC machine connected is: /dev/tty /dev/tty13 /dev/tty19 /dev/tty24 /dev/tty3 /dev/tty35 /dev/tty40 /dev/tty46 /dev/tty51 /dev/tty57 /dev/tty62 /dev/ttyS0 /dev/ttyS14 /dev/ttyS2 /dev/ttyS25 /dev/ttyS30 /dev/ttyS8 /dev/tty0 /dev/tty14 /dev/tty2 /dev/tty25 /dev/tty30 /dev/tty36 /dev/tty41 /dev/tty47 /dev/tty52 /dev/tty58 /dev/tty63 /dev/ttyS1 /dev/ttyS15 /dev/ttyS20 /dev/ttyS26 /dev/ttyS31 /dev/ttyS9 /dev/tty1 /dev/tty15 /dev/tty20 /dev/tty26 /dev/tty31 /dev/tty37 /dev/tty42 /dev/tty48 /dev/tty53 /dev/tty59 /dev/tty7 /dev/ttyS10 /dev/ttyS16 /dev/ttyS21 /dev/ttyS27 /dev/ttyS4 /dev/tty10 /dev/tty16 /dev/tty21 /dev/tty27 /dev/tty32 /dev/tty38 /dev/tty43 /dev/tty49 /dev/tty54 /dev/tty6 /dev/tty8 /dev/ttyS11 /dev/ttyS17 /dev/ttyS22 /dev/ttyS28 /dev/ttyS5 /dev/tty11 /dev/tty17 /dev/tty22 /dev/tty28 /dev/tty33 /dev/tty39 /dev/tty44 /dev/tty5 /dev/tty55 /dev/tty60 /dev/tty9 /dev/ttyS12 /dev/ttyS18 /dev/ttyS23 /dev/ttyS29 /dev/ttyS6 /dev/tty12 /dev/tty18 /dev/tty23 /dev/tty29 /dev/tty34 /dev/tty4 /dev/tty45 /dev/tty50 /dev/tty56 /dev/tty61 /dev/ttyprintk /dev/ttyS13 /dev/ttyS19 /dev/ttyS24 /dev/ttyS3 /dev/ttyS7 After connecting the CNC, the command is typed again and the output is: /dev/tty /dev/tty13 /dev/tty19 /dev/tty24 /dev/tty3 /dev/tty35 /dev/tty40 /dev/tty46 /dev/tty51 /dev/tty57 /dev/tty62 /dev/ttyS0 /dev/ttyS14 /dev/ttyS2 /dev/ttyS25 /dev/ttyS30 /dev/ttyS8 /dev/tty0 /dev/tty14 /dev/tty2 /dev/tty25 /dev/tty30 /dev/tty36 /dev/tty41 /dev/tty47 /dev/tty52 /dev/tty58 /dev/tty63 /dev/ttyS1 /dev/ttyS15 /dev/ttyS20 /dev/ttyS26 /dev/ttyS31 /dev/ttyS9 /dev/tty1 /dev/tty15 /dev/tty20 /dev/tty26 /dev/tty31 /dev/tty37 /dev/tty42 /dev/tty48 /dev/tty53 /dev/tty59 /dev/tty7 /dev/ttyS10 /dev/ttyS16 /dev/ttyS21 /dev/ttyS27 /dev/ttyS4 /dev/ttyUSB0 /dev/tty10 /dev/tty16 /dev/tty21 /dev/tty27 /dev/tty32 /dev/tty38 /dev/tty43 /dev/tty49 /dev/tty54 /dev/tty6 /dev/tty8 /dev/ttyS11 /dev/ttyS17 /dev/ttyS22 /dev/ttyS28 /dev/ttyS5 /dev/tty11 /dev/tty17 /dev/tty22 /dev/tty28 /dev/tty33 /dev/tty39 /dev/tty44 /dev/tty5 /dev/tty55 /dev/tty60 /dev/tty9 /dev/ttyS12 /dev/ttyS18 /dev/ttyS23 /dev/ttyS29 /dev/ttyS6 /dev/tty12 /dev/tty18 /dev/tty23 /dev/tty29 /dev/tty34 /dev/tty4 /dev/tty45 /dev/tty50 /dev/tty56 /dev/tty61 /dev/ttyprintk /dev/ttyS13 /dev/ttyS19 /dev/ttyS24 /dev/ttyS3 /dev/ttyS7 An additional device names /dev/ttyUSB0is listed. This name for the USB interface must be specified when reading out the firmware. The "avrdude" software may have to be installed for this, which can be done with the two commands:
sudo apt-get update Now we are prepared to copy the firmware to the harddisc of your PC, which is done with the commands:
avrdude -u -c arduino -p m328p -P /dev/ttyUSB0 -b 115200 -U flash:r:"3018pro.hex":i If the name for the USB interface on your computer is not "/dev/USB0", you must change the parameter after -P accordingly (e.g. to "/dev/USB1" or "/dev/ttyACM0"). In both cases, avrdude must show that the firmware was read successfully:
Reading | ################################################## | 100% 0.00s If reading the firmware did not succeed, the output might look like this:
avrdude: stk500_recv(): programmer is not responding The reason is very likely a wrong baud rate of the USB interface. With my 3018Pro I had to change this to 57600 baud:
avrdude -u -c arduino -p m328p -P /dev/ttyUSB0 -b 57600 -U flash:r:"3018pro.hex":i Just try different baud rates (e.g. 110, 300, 600, 1200, 2400, 4800, 9600, 14400, 19200, 38400, 57600, 115200, 128000 and 256000) until the reading works. In any case, there must now be two new files named "3018pro.hex" and "3018pro_eeeprom.hex" on your hard disk and the file size must be several kilobytes, otherwise the firmware reading has failed and I do not recommend fiddling with the firmware of the CNC!!! If the firmware backup worked, the original firmware can be restored on the CNC machine at any time with the commands:
avrdude -u -c arduino -p m328p -P /dev/ttyUSB0 -b 115200 -U flash:w:"3018pro.hex":i By what your CNC is back to the original firmware. After creating the backup copy, you can program the CNC same as any Arduino UNO using the Arduino IDE. If you used a different baud rate than 115200 when creating the backup copy of the firmware, the Arduino IDE has to be adjusted. With my 3018Pro it was 57200 baud. To do this, the "boards.txt" file of the Arduino IDE must be adapted. Under Linux Mint, this file is located in the directory: ./.arduino15/packages/arduino/hardware/avr/1.8.6/boards.txt Open this file with a text editor and add the following lines:
The line following is crucial: cnc3018.upload.speed=57600 Change the baud rate to the one you used when successfully saving the firmware. 
After (re)starting the Arduino IDE you can choose Tools->Board->Arduino AVR-> and finally the new list entry "3018Pro". With that you can upload code as with any Arduino UNO. <<< Xylophone Demonstration servo motor >>> News The Project Technology RoboSpatium Contribute Subject index Archives Download Responses Games Links Gadgets Contact Imprint |
|
|